

Label & receipt printing setup
BenchKey Printing sends labels, receipts and documents straight to the printers you already own (Zebra, Brother, DYMO, most thermal receipt printers), without the browser’s print dialog. It needs a computer that the printers are connected to (not a phone or tablet), and it is part of Pro and Business where available. Label printing (DYMO and BenchKey Printing) is part of Pro and Business. Printing receipts, invoices and estimates from the browser works on every plan, with nothing to set up, and keeps working while you set up BenchKey Printing.
The owner, or a teammate with printing setup permission, does the setup.
Set up the shop computer
Section titled “Set up the shop computer”Open Settings → Integrations & Shipping → Integrations → Printing (PrintNode) and follow the setup option shown for your shop:
- Standard PrintNode app: if the card offers Download PrintNode and a printing account email, install that app on the computer connected to your printers. Choose Show password and sign into PrintNode with the printing account details shown. BenchKey has already created that account. Return to the card, choose printers for labels, receipts and documents, send test prints, and switch BenchKey Printing on.
- BenchKey Print Connector: if the card offers Download connector and Create setup code, follow the steps below.
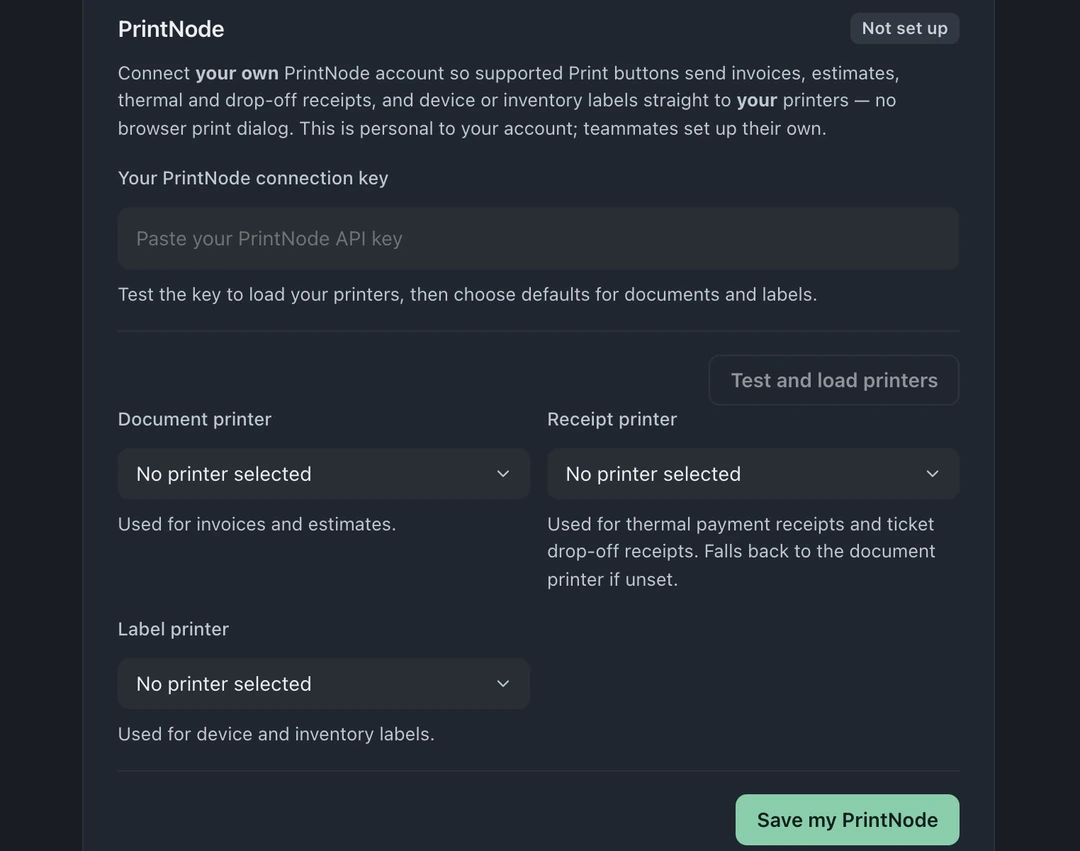
- PrintNode with your own key: in the PrintNode card below BenchKey Printing, enter Your PrintNode connection key, choose Test and load printers, select the document, receipt, and label printers, then choose Save my PrintNode.
For the BenchKey Print Connector, the card walks you through Enable printing, Install and connect, Choose printers and Test and finish:
-
Enable printing. Choose Enable BenchKey Printing. BenchKey creates and looks after the printing account for your shop; there’s nothing to sign up for.
-
Install and connect. On the computer your printers are plugged into, choose Download connector and install the BenchKey Print Connector. Then choose Create setup code. Open the connector, choose Set up with BenchKey, and enter the BenchKey email and One-time setup code shown on the card. A code expires after a while; if it does, choose Create a new code.
-
Choose printers. The computer appears with its printers. Pick a printer for each type of printout, or use Quick setup: use one printer for everything. Choices save the moment you pick them.
- Labels: device labels at check-in and inventory labels (your label printer)
- Receipts: counter receipts at payment and drop-off (your receipt printer)
- Documents: invoices, estimates and full-page forms (your regular printer)
Under Who these printers apply to, choose Everyone uses these printers, or Each person picks their own printers (people then choose their own from My printers).
-
Test and finish. Press Test next to each printer to send a test page, then choose Finish setup and activate.
Multi-location shops (Business) choose printers per location; see Multi-location setup.
If direct printing is unavailable and the card offers neither the standard client nor legacy setup, keep printing receipts, invoices and estimates from the browser. Label printing remains part of Pro and Business.
Printing by hand, prompts and automatic receipts
Section titled “Printing by hand, prompts and automatic receipts”- Device labels: choose Print Label on the ticket.
- Drop-off receipts: in Settings → Business → Terms → Receipts and drop-off slips, Print a drop-off receipt when a ticket is created is off by default. When enabled, after Create Ticket, the Print drop-off receipt? prompt offers Skip or Print.
- Square Terminal receipts: in the same settings, Also print Square Terminal receipts from BenchKey prints the receipt for a Square Terminal sale through BenchKey Printing when switched on.
Reprints and printing by hand
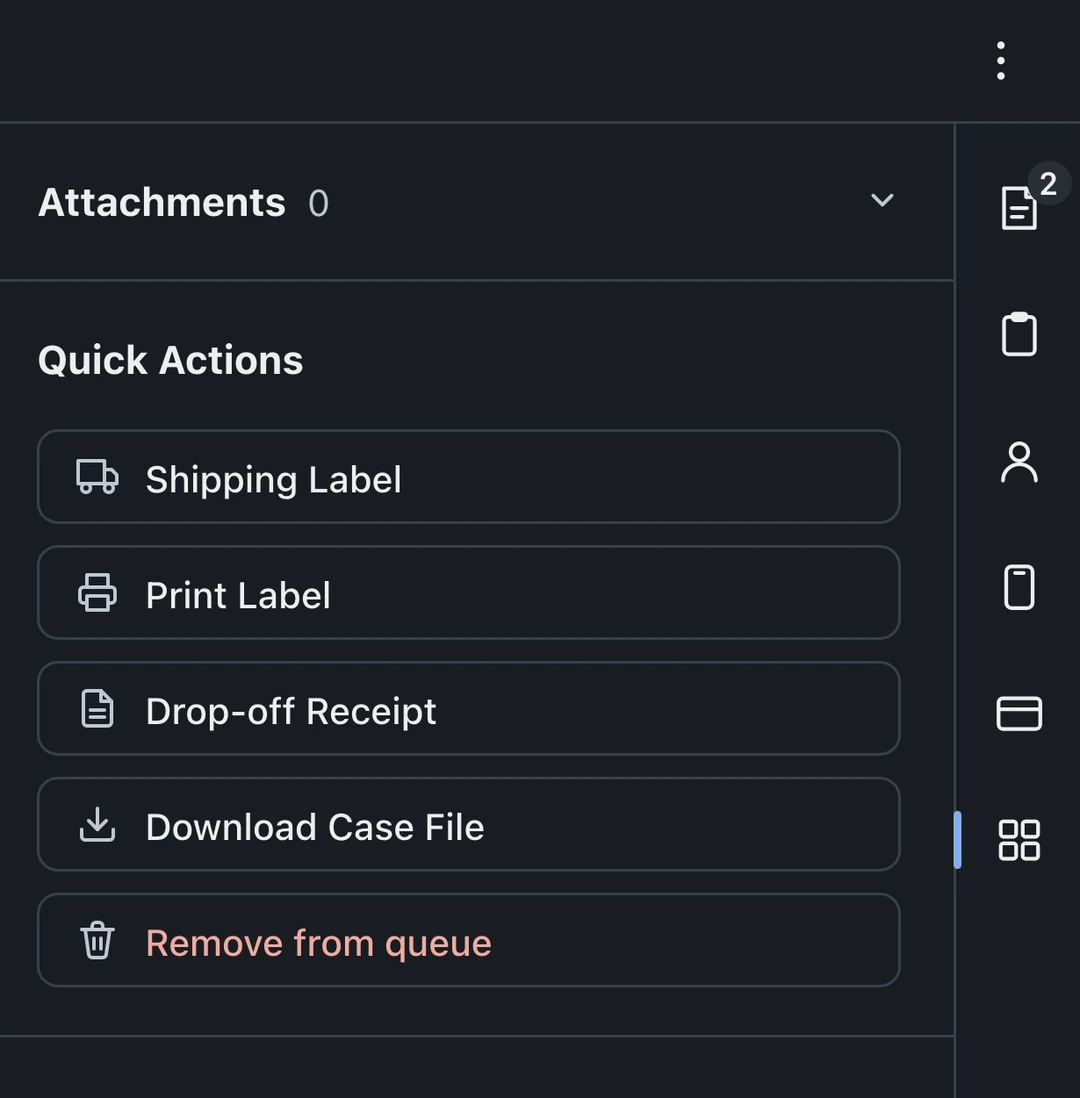
Section titled “Reprints and printing by hand”On a ticket, open ⋮ Ticket actions for Print Label and Drop-off Receipt. Both are also in Files and shipping → Quick Actions. Damaged label, second unit, or another customer copy: print it again from the source ticket. Until a computer is connected, the same actions open your browser’s normal print dialog, so nothing is blocked. On Standard, receipts and drop-off receipts print this way; labels are part of Pro and Business.
Physical printing depends on the connected computer, selected printer, and loaded label stock.
When a print does not come out
Section titled “When a print does not come out”- Is the PrintNode app or BenchKey Print Connector running on the shop computer? On the card, the computer shows Online when it is connected.
- Is the printer switched on with paper or labels loaded? A job can wait while a printer is offline; BenchKey shows that warning instead of pretending the paper printed.
- Check the printer chosen for that type of printout, press Test, then reprint from the source ticket.
- If the computer shows Offline after a restart, open the installed app again. For the standard PrintNode app, use the printing account details shown in Settings. For the BenchKey Print Connector, choose Create a new code if you need to connect it again. Legacy connections use their existing PrintNode account.
If the card says Direct printing is paused, choose Resume printing. Your computers and printer choices are kept while printing is paused.
Labels print off center, crooked or cut off
Section titled “Labels print off center, crooked or cut off”The most likely cause is a mismatch between the printer’s label size and Settings → Documents & Labels → Printed Labels. The printer’s position or offset settings can also shift a label. BenchKey cannot read those settings or move, rotate or calibrate a label.
Ticket and inventory labels use the Printed Labels size with no page margins. BenchKey Printing sends labels and receipts at their exact size, without scaling.
On the computer connected to the printer:
- Open the printer’s Printing Preferences and match its paper size to Printed Labels and the loaded roll.
- Calibrate the printer so it finds the label edges. With Zebra’s Windows ZDesigner driver, use Tools → Calibrate media in Printing Preferences. Not every Zebra setup has this menu; use your printer’s utility or buttons instead. On a DYMO, choose the matching label roll and paper size.
- If the size matches but labels still shift, check the printer’s label position or offset settings, if available.
- Print again, or press Test next to Labels in BenchKey Printing.
Without a label printer selected in BenchKey Printing, a ticket label opens the browser’s print page; an inventory label opens a PDF. Select the label printer and matching paper size, set margins to None, scale to 100% or Default, and turn off headers and footers. If the size is missing, add it in the printer’s Printing Preferences first.
Printed Labels sizes
Section titled “Printed Labels sizes”| Name | Size in inches |
|---|---|
| Standard device (default) | 3.5 × 1.125 |
| Small device | 2.25 × 1.25 |
| Tall label | 2.25 × 4 |
| Large label | 4 × 6 |
| Custom | 0.75 to 8 per side |
The size applies to the whole shop; printer choices are per store. Inventory labels use this size, but not the text size or fields from Printed Labels.
Shipping labels are separate and do not use BenchKey Printing: Shippo opens a PDF, and UPS labels are 4 × 6 inch images.
Adding a second computer or printer
Section titled “Adding a second computer or printer”On the new computer, install the same printing app used by your shop. The standard PrintNode app uses the printing account details in Settings; the BenchKey Print Connector uses a new setup code from Connect another computer. Legacy connections use their existing PrintNode account. Its printers join the list; choose and test them per type of printout. Where the card offers Remove, use it to stop using an old computer.
Shops moving from an older PrintNode connection see Move from legacy printing: the old connection keeps working until the new setup is tested and you choose Switch to BenchKey Printing.