

Checkout & the cash register
Esta página aún no está disponible en tu idioma.
Before taking payment, choose the correct store. Only owners and admins can take cash, create payment links (including Create payment link in Quick sale), open or close the register drawer, and record cash movements; technicians can take card payments on the shop’s reader. Cash requires an open register drawer at that store; open it with the starting float first. Card payments require a connected processor and an assigned compatible reader. Payment links require working online-payment setup and a customer contact channel.
The Checkout section handles three jobs: quick retail sales, cashing out finished repairs, and the cash register’s daily cycle. They share one screen.
Open Checkout from the cart icon near the top of the left rail. Its tabs are Quick sale for retail, Customer lookup for open invoices, Register for the drawer, and Activity for transaction history.
The partial payment leaves a balance in Checkout, and the next cash payment marks the invoice paid. This recording uses fictional shop data in the real app.
Open the register, record a cash sale, count the drawer and close it with a summary you can print. (1 min 13 s)
Ring up a quick sale
Section titled “Ring up a quick sale”- Click Quick sale.
- Type the item name in the line editor; saved items autocomplete as you type, or scan a barcode. Price and quantity sit on the same row. Add rows with Add item.
- Review the discount, tax, and total. Choose Cash, then Record cash followed by the amount to open the cash payment dialog.
- Enter the Cash tendered: the amount the customer hands you. Use an exact or quick amount, or type it. BenchKey shows any change before you record the payment.
- Confirm the payment and check the saved balance. Once fully paid, choose a receipt option.
Card and Create payment link are also available when your provider setup supports them. Creating a payment link does not mark the sale paid; payment must be confirmed.
See where to connect Stripe or Square and how to record a cash sale without connecting either account. (54 s)
Take a partial cash payment
Section titled “Take a partial cash payment”In the cash dialog, click Split this cash payment. Under Enter payment by, choose Amount or Percentage of balance, then enter the Cash portion. Cash tendered is separate: it records what the customer actually hands you. You can also enter less than the balance in Cash tendered, review the partial payment and remaining balance shown in the dialog, and confirm the payment.
For an existing invoice, open Customer lookup, select the invoice, choose Pay, then Split payment (manual methods). Select Cash, enter the portion being paid, and record the payment. Check the invoice’s remaining balance before taking another payment.
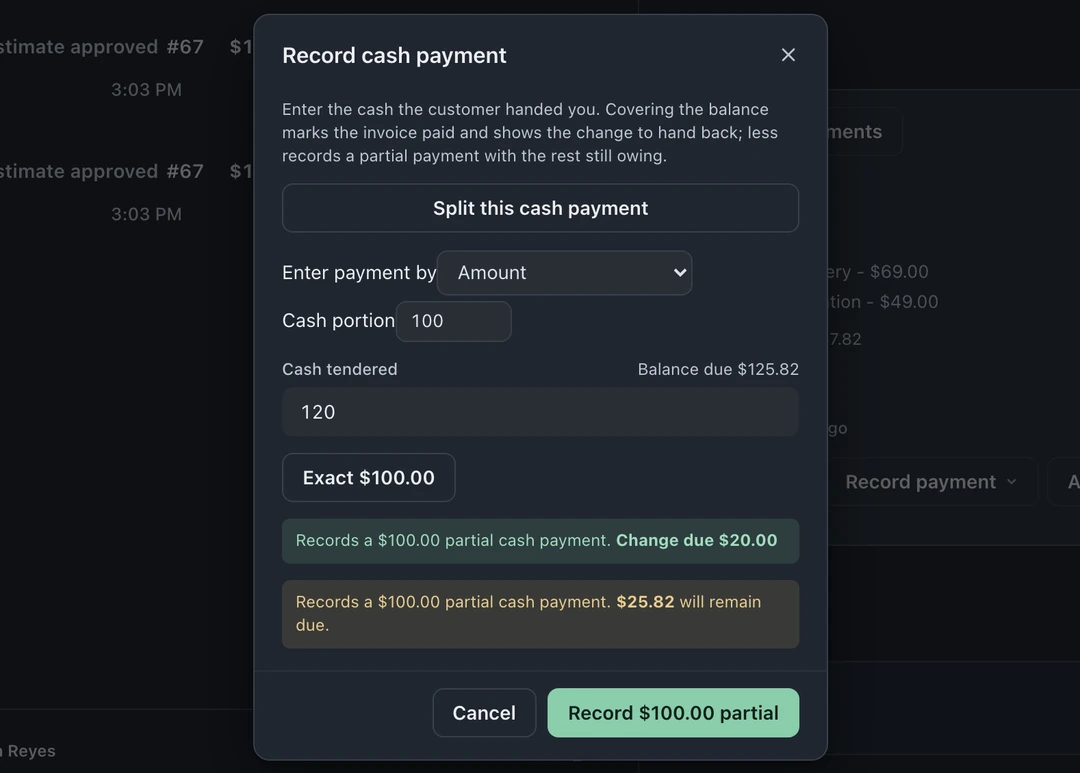
The partial payment is saved on the invoice; the invoice is not marked paid until the remaining balance is collected. To finish with cash, choose Cash again, check the amount against the remaining balance, and record it. Receipt options appear after the sale is fully paid.
Cash out a repair
Section titled “Cash out a repair”Open the repair ticket’s Money panel using its icon at the right edge. Choose New invoice or convert an approved estimate, review any discount, and use Apply previous payment for eligible money already recorded. Check the remaining balance, then choose an available payment method from Record payment. You can also find open invoices through Checkout → Customer lookup.
See invoicing and payments, or follow the invoice and payment guide. Card and online payments depend on connected providers. Receipt delivery depends on your configured channels and customer contact details.
Run the register day
Section titled “Run the register day”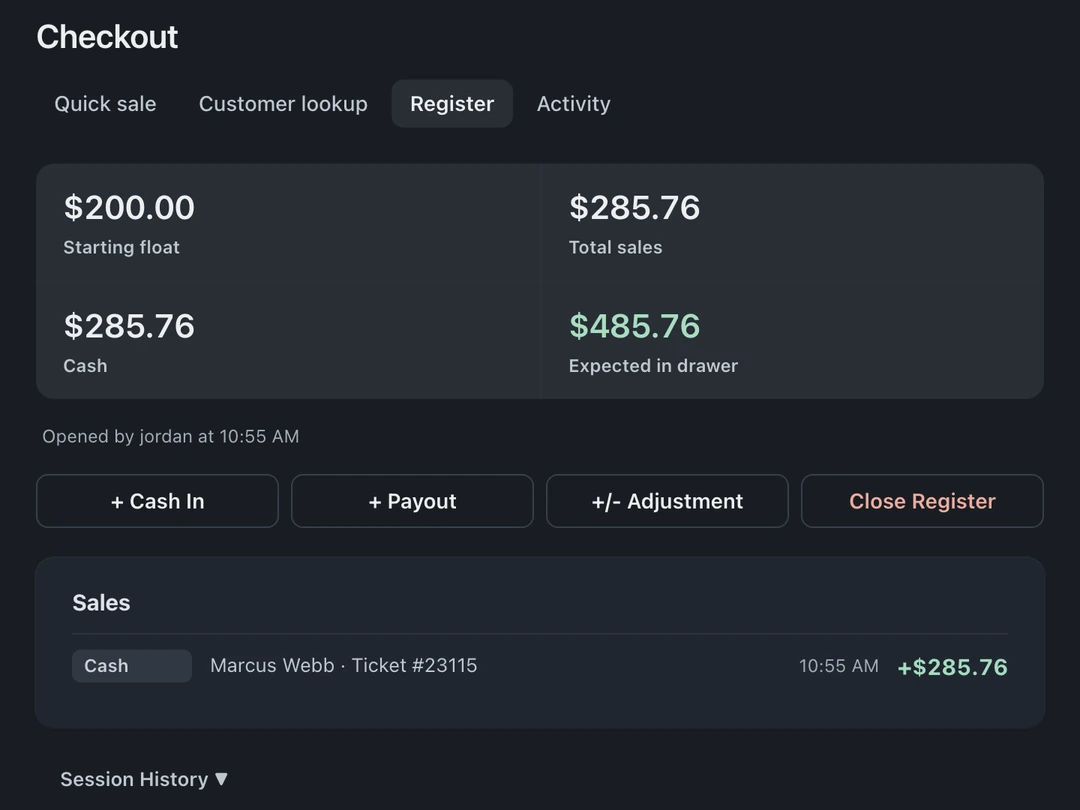
- Click Open Register at the start of the day and enter the starting float, the cash that begins the drawer.
- During the day, every cash sale logs itself. Use + Cash In, + Payout, and +/- Adjustment for the non-sale cash movements (owner drops, parts runs, correcting a miscount).
- Click Close Register at the end of the day and count the drawer. Change any bill or coin count that differs; the counts start filled in to the expected amount. BenchKey compares Counted Cash with Expected Cash and shows the Discrepancy. Then click Close & Print Summary. Any discrepancy is saved with that register session and the name of whoever closed it, so you catch it the same day, not at month end.
Session History (owners and admins; it reads Past sessions while the register is closed or on a phone) lists the last 20 closed sessions for the store. Each shows the date, who closed it, expected and counted cash, and the discrepancy. Print opens a session’s full summary with its cash sales, payouts and close-out numbers. For older sessions, use Reports → Register Sessions (Pro and Business).
Common questions
Section titled “Common questions”- Refunds (owners and admins): eligible rows in Activity have a Refund action. The refund is recorded on the original invoice. A cash refund comes out of the open drawer and shows under Register events.
- Receipts: reprint or resend from the transaction in Activity, or open the invoice in the ticket’s Money panel and choose Receipt.
- Who sold it: the “Who did this work?” selector on the sale credits the right person, which feeds commissions if you use them. See Time clock & commissions.
- Store credit (owners and admins): customers can carry a credit balance (from trade-in payouts) and spend it on an invoice that is still open for payment and has their email or phone on it: choose Store credit under Split payment (manual methods), up to their balance. The ledger tracks every movement.