

The customer portal
Este conteúdo não está disponível em sua língua ainda.
Eligible repair tickets have a private portal link, the customer’s window into their repair. Hidden, deleted, and billing-only tickets are excluded. Walk-in tickets also require the shop’s walk-in portal setting to be enabled. No account, no app, no password: the link itself is the key.
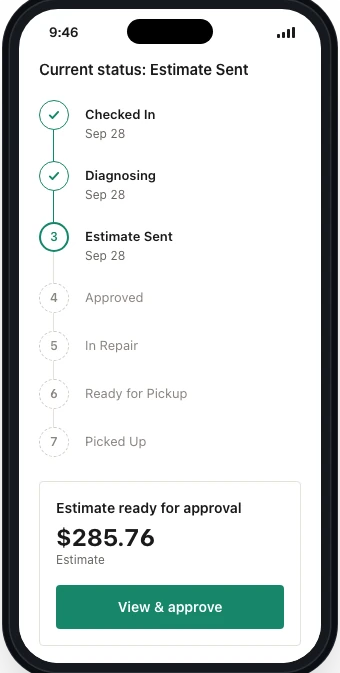
Every plan includes the status timeline, estimate approval, and invoice payment. Pro and above add the full portal with two-way messaging and customer uploads. Payment, messaging, and file-sharing availability also depend on the shop’s configuration.
Set your booking hours, share your booking page and find a repair's private customer portal link. (1 min 33 s)
What customers see
Section titled “What customers see”- The status timeline, received, diagnosed, approved, in repair, ready, lighting up as the ticket moves
- Estimates, with recorded approve/decline decisions and any required name, signature, and terms confirmation
- Invoices, payable right in the portal
- Photos and attachments you’ve marked customer-visible (Pro and Business)
Visibility: private by default
Section titled “Visibility: private by default”Internal notes stay with your team and are never shared through the portal. Photos and attachments are internal by default; choose which ones customers can see with their visibility controls. Bench notes stay in the shop; a photo of the corrosion can be shared with the customer.
Configuring the timeline
Section titled “Configuring the timeline”In Settings, the portal timeline maps your internal statuses to customer-facing steps, per ticket type:
- Walk-ins, their own in-store timeline, by default from Checked In to Picked Up (on the default timeline the estimate steps hide when no estimate is sent). Set it under Settings → Business → Customer Portal → Walk-in portal.
- Mail-ins, their own timeline, by default from Received to Delivered, set under Settings → Business → Customer Portal → Timeline and statuses (mail-in). On the default timeline, Estimate Sent appears after an estimate is sent and Delivered once the return shipment has tracking.
- Walk-ins only: turn off Show progress timeline under Walk-in portal for an info-only portal with no progress bar. Customers still see their ticket’s details, invoices and estimates.
How customers get the link
Section titled “How customers get the link”For eligible tickets, the portal link goes out in intake messages and status notifications that include its template variable. On the ticket, open ⋮ Ticket actions → Customer Portal to view it or choose Copy portal link to share it. The Customer panel also has portal and copy controls.
Security notes
Section titled “Security notes”Each repair-status link contains a private, hard-to-guess token stored against one ticket. BenchKey checks that the token matches the ticket and that the ticket remains eligible for portal access. These tokens do not have an automatic expiry; invalid links are rejected, with the response depending on the portal endpoint. Treat the link as private because anyone holding it can access that repair’s portal.
Branding the portal
Section titled “Branding the portal”The portal carries your identity, configured under Settings → Business → Customer Portal:
- Portal logo: the portal shows the logo from your Business Profile (Settings → Business → Profile). On the portal’s Branding page, Logo height sets how tall it appears in the header.
- Brand colors: the portal’s buttons use the Primary brand color from your business profile unless you pick an Accent color (start) under Customer Portal → Branding → Brand colors.
- Timeline mapping: you choose which internal statuses appear as customer-facing steps for each ticket type. Customers see clean progress, not your internal workflow vocabulary.